SSH (Secure Shell) is a powerful tool that allows you to remotely manage your Raspberry Pi from another computer or device. Whether you're a beginner or an experienced user, learning how to SSH into a Raspberry Pi can significantly enhance your ability to control and configure your device without needing direct access.
In today's digital age, remote access has become essential for managing devices efficiently. SSH provides a secure and encrypted connection, ensuring your data remains protected while you work on your Raspberry Pi projects. This guide will walk you through the process of setting up and using SSH on your Raspberry Pi step by step.
By the end of this article, you will have a thorough understanding of how to SSH into a Raspberry Pi, including troubleshooting tips and best practices to ensure a smooth experience. Let's dive in!
Read also:Michael Vick Rushing Yards A Comprehensive Analysis Of His Impressive Career
Table of Contents
- Introduction to SSH
- Raspberry Pi Overview
- Enabling SSH on Raspberry Pi
- Finding Your Raspberry Pi's IP Address
- Connecting via SSH Client
- Using Password Authentication
- Key-Based Authentication
- Troubleshooting SSH Connection Issues
- Advanced SSH Features
- Security Best Practices
Introduction to SSH
SSH, or Secure Shell, is a network protocol that provides secure communication between two devices over an unsecured network. It is widely used for remote administration and file transfers. When you learn how to SSH into a Raspberry Pi, you gain the ability to manage your device from anywhere in the world, provided you have internet access.
One of the key advantages of SSH is its encryption capability, which ensures that all data transmitted between your computer and Raspberry Pi remains private and secure. This makes it ideal for tasks such as system updates, file management, and running scripts remotely.
Before proceeding, it's important to note that SSH is disabled by default on Raspberry Pi OS for security reasons. You will need to enable it manually, which we will cover in detail later in this guide.
Raspberry Pi Overview
The Raspberry Pi is a small, affordable computer that has gained immense popularity among hobbyists, educators, and professionals alike. It is a versatile device capable of running a variety of operating systems and performing tasks ranging from basic computing to complex automation projects.
For those unfamiliar with the Raspberry Pi, it is essentially a single-board computer that can be connected to a monitor, keyboard, and mouse to function as a full-fledged computer. However, one of its most appealing features is the ability to control it remotely using tools like SSH, making it ideal for headless operations (without a monitor or keyboard).
Why Use Raspberry Pi for Remote Access?
- Cost-effective and energy-efficient
- Perfect for automation and IoT projects
- Supports a wide range of operating systems
- Easy to set up and configure
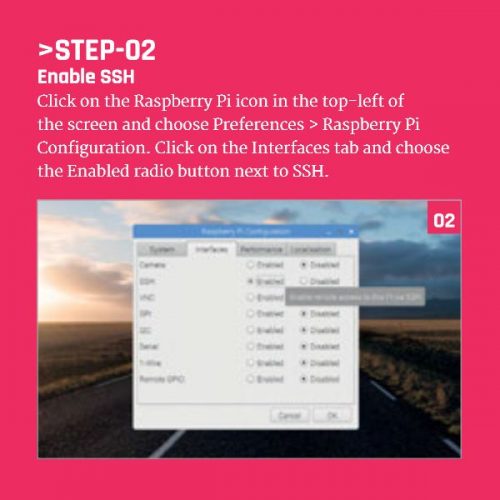
Enabling SSH on Raspberry Pi
As mentioned earlier, SSH is disabled by default on Raspberry Pi OS. To use SSH, you must first enable it. There are two primary methods to enable SSH on your Raspberry Pi:
Read also:What Is Vertical Labret A Comprehensive Guide To This Unique Piercing
Method 1: Using Raspberry Pi Configuration Tool
- Boot your Raspberry Pi and log in to the desktop environment.
- Open the terminal and type
sudo raspi-config. - Use the arrow keys to navigate to "Interfacing Options" and press Enter.
- Select "SSH" and enable it.
- Reboot your Raspberry Pi for the changes to take effect.
Method 2: Adding an SSH File
If you're setting up your Raspberry Pi for the first time and don't have a monitor or keyboard, you can enable SSH by adding an empty file named "ssh" to the boot partition of your SD card. Here's how:
- Insert the SD card into your computer.
- Locate the boot partition and create a new file named "ssh" (no file extension).
- Insert the SD card back into your Raspberry Pi and power it on.
Finding Your Raspberry Pi's IP Address
To establish an SSH connection, you need to know the IP address of your Raspberry Pi. There are several ways to find it:
Method 1: Using the Terminal
- Open the terminal on your Raspberry Pi.
- Type
hostname -Iand press Enter. This will display the IP address.
Method 2: Using Router Administration
Log in to your router's administration page and look for a list of connected devices. Your Raspberry Pi should be listed along with its IP address.
Connecting via SSH Client
Once you have the IP address, you can connect to your Raspberry Pi using an SSH client. On most Linux and macOS systems, SSH is pre-installed. For Windows, you may need to use a client like PuTTY.
Connecting from Linux or macOS
- Open the terminal.
- Type
ssh pi@, replacing - Enter the password when prompted.
Connecting from Windows
- Download and install PuTTY.
- Launch PuTTY and enter the IP address of your Raspberry Pi in the "Host Name" field.
- Select "SSH" as the connection type and click "Open."
- Enter the username (default is "pi") and password when prompted.
Using Password Authentication
By default, the Raspberry Pi user account "pi" has the password "raspberry." While this is convenient for beginners, it is highly recommended to change the default password for security reasons. Here's how:
- Log in to your Raspberry Pi via SSH.
- Type
sudo passwd piand press Enter. - Enter a new password and confirm it.
Key-Based Authentication
For added security, you can set up key-based authentication instead of relying on passwords. This method involves generating a pair of public and private keys:
Steps to Set Up Key-Based Authentication
- On your local machine, open the terminal and type
ssh-keygento generate a key pair. - Follow the prompts to specify the location and passphrase for your keys.
- Copy the public key to your Raspberry Pi by running
ssh-copy-id pi@. - Test the connection by logging in without entering a password.
Troubleshooting SSH Connection Issues
Despite following the steps correctly, you may encounter issues when trying to SSH into your Raspberry Pi. Below are some common problems and their solutions:
- Connection Refused: Ensure SSH is enabled on your Raspberry Pi and verify the IP address.
- Incorrect Password: Double-check the password or reset it if necessary.
- Timeout Errors: Check your network connection and ensure there are no firewall restrictions.
Advanced SSH Features
SSH offers a range of advanced features that can enhance your experience with Raspberry Pi:
Port Forwarding
Port forwarding allows you to access services running on your Raspberry Pi from outside your local network. For example, you can set up a web server and access it remotely.
Tunneling
SSH tunneling can be used to securely access services that are not encrypted by default, such as HTTP or FTP.
Security Best Practices
While SSH provides a secure connection, it's important to follow best practices to protect your Raspberry Pi:
- Change the default password immediately after setup.
- Use key-based authentication instead of passwords.
- Disable root login to prevent unauthorized access.
- Regularly update your Raspberry Pi OS and installed packages.
Conclusion
Learning how to SSH into a Raspberry Pi opens up a world of possibilities for remote management and automation. By following the steps outlined in this guide, you can set up SSH securely and efficiently. Remember to always prioritize security by implementing best practices and staying informed about potential vulnerabilities.
We encourage you to share your experiences or ask questions in the comments section below. Additionally, feel free to explore other articles on our site for more tips and tutorials on Raspberry Pi and related technologies. Happy coding!